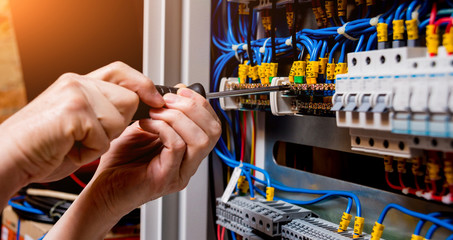
The Essential Parts of Electrical Installs
Electrical wires carry power into spaces like homes and offices. They’re insulated and protected by their sheathing, which is typically black or red.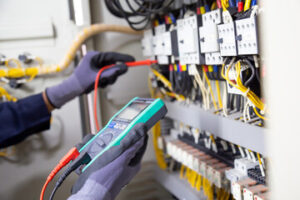
The wires connect to a distribution board (fuse box), which holds circuit breakers or fuses. If a circuit overheats, the breakers shut off power to that area.
Electrical wiring is one of the most important parts of any electrical installation. It determines how much current can be run through a circuit and what kind of outlets or switches will be installed. This requires careful planning, including determining the right wire size for each job and creating a timeline for when tasks should be completed. It’s also essential to have the right tools for the job, such as a cable cutter, cable stripper, wire snips, and testers.
Before beginning any work on an electrical installation, it’s important to familiarize yourself with the relevant safety regulations and standards. This will help ensure that the work is completed safely and correctly, protecting both you and any occupants of the building. It’s also a good idea to practice proper operating procedures for power tools, as these can be dangerous if not used properly.
There are many different types of electrical wiring systems, and the type you choose will depend on your specific needs and the building’s layout. For example, if you need to run power from an outlet to a fixture, you’ll want to use a thinner gauge of wire than if you were connecting two outlets together. This will allow the outlet to handle more current, reducing the risk of overheating.
Another common electrical wiring system is called a “knob and tube” system. This uses insulated wires that are connected to porcelain, wood, or plastic cleats fixed to walls and ceilings at regular intervals. The cleats are fitted with tinned brass link clips that hold the wire in place. This system is cheap and easy to install, but it’s not suitable for permanent installations because it can cause fires if the insulation is compromised.
A supply cable sets out from the meter box and runs into your distribution board, which is sometimes called a fusebox. This will distribute the electricity to the different circuits in your home or office, powering lights and appliances. Each circuit is protected by a circuit breaker, which can be switched off in the event of a fault. If your circuit gets overloaded, this switch will cut off the power to the appliance or light. This will prevent serious damage and injury.
Outlets
An electrical installation can involve new outlets, switches, and lighting fixtures. The breaker box that supplies electricity to the home or office will also be part of the installation. The breaker box will break the power up into circuits that can run throughout the building to outlets and other fixtures.
When it comes to adding an outlet, if there’s already an opening on the wall, it’s usually relatively easy to add one without having to snake wires through the walls. This is especially true if the existing outlet is on the opposite side of the wall from where you want to place the new one.
Remove the faceplate from the old outlet and unscrew the mounting screws that hold it to the electrical box. Then trace the shape of the outlet on the wall using the height measurements from the existing outlet. Carefully cut along the traced outline, making sure to leave enough room for the new outlet.
Turn off the power to the circuit breaker that feeds the outlet you’re working on, and then disconnect the wires from the existing outlet. If you’re wiring a switch after the outlet, use this time to run a length of cable from the breaker box to the location where the switch will be installed. Make sure you use the proper size breaker for the cable you’re running.
Connect the ground wire, if needed. If you’re using a metal box, cut (2) eight-inch lengths of bare copper wire and combine them with the bare wire from the Romex (r) cable under a properly sized wirenut. Then connect the free ends of these two wires to the green ground screw on the outlet.
If you’re installing a light fixture after the outlet, connect a length of wire from the breaker box to the new outlet, making sure you use the correct size breaker for the cable you’re working with. Once the wire is connected, connect it to the second terminal on the switch and wrap black electrical tape around it. This indicates that the wire is now the hot wire coming from the switch.
Switches
The switches in an electrical installation are what connect the wires to outlets, lights, and appliances. Changing a switch is an easy DIY project, but like any project that involves electricity, it must be done with caution to avoid shock and fire. First, turn off power at the circuit breaker or fuse box in the area where you’re working. Then, unscrew the old switch and remove it with its attached wires. Using a voltage tester, make sure the wires are dead before you disconnect them from the switch. Once the wires are disconnected, you can begin connecting them to the new switch.
Single-pole switches have two screw terminals that are connected by a wire nut, while three-way switches have three terminal screws. The darkest terminal screw (usually black or copper) on the switch is called the common, and it’s important to identify it so you don’t accidentally connect it to another wire that would cause a short circuit. The other two screw terminals on a three-way switch are for the red and black traveler wires, which connect to the light and the second switch. Identify the wires by looking at their color and matching them with the ones on the new switch.
Once the new switch is in place, the wires are hooked up to it by their hooks and screwed down. Next, wrap the switch in electrical tape to protect it from damage. Finally, replace the switch plate and screw it back into the wall. Once the switch is working, you can turn the power back on at the circuit breaker or fuse box.
Electrical installations have many components, including line poles, fuses, circuit breakers, and wiring. These devices help to distribute electricity throughout the building, and they’re essential for the safety of employees and customers.
Electrical installations are designed by electrical engineers, who are responsible for ensuring that all wiring meets industry standards. In addition, electrical engineers must also ensure that the installation is safe and reliable. To ensure this, electrical installation services must undergo testing and inspection. This article discusses the tests that are necessary for any internal electrical installation.
Circuits
In most places on the planet, electricity powers most of the devices and equipment that people use every day. Most of us encounter electricity hundreds of times a day without even thinking about it. However, most of us would be very surprised to learn that there are a huge number of wires and circuits that make this possible.
The most basic electric circuit is composed of a power source (such as a battery), an energy receiver (like a light bulb), and an energy pathway (such as a wire). All of these things work together to provide electricity to a device in our homes or workplaces. If there is a fault or defect in any of the parts of an electrical circuit, it will not be able to function properly, and we risk the danger of fire or electrocution.
This is why all electrical installations and wiring systems are subject to strict regulations. These include the requirements for: the characteristics of electrical conductors; knowledge of the theory of electricity; understanding alternating and direct current supplies; and the mains equipment that provides protection against excess current, such as fuses and circuit breakers.
All of the electrical circuits in your home or business are designed to carry the rated current that they are intended for. Electrical safety codes set the maximum allowable current based on the size of the conductor, its voltage potential, the insulation type and thickness, the temperature rating of the cable, and whether it is suitable for wet or dry locations, hot or cold environments, etc.
Insulated wires run between all of the different pieces of electrical equipment in your home or business. They may be bare aluminum wires in sheathing, or they may be run in conduit or specialized ducting made of metal or PVC. In the case of ducting, it is also referred to as trunking.
It is important that all insulated wires are kept neat and tidy, as this helps to reduce the risk of accidental contact with live wires and protects the integrity of the insulated cable. It is also a requirement of the electrical safety code that all wires be labeled.